
Play Modes Overview
The first thing to understand about Callie Grams is the play mode. It controls how clips are routed to outputs and is the foundation for everything else.
Callie Grams has two play modes:
- Default — multi-output mode. Unassigned clips auto-distribute; assigned clips route to their output.
- Single Output — every clip routes to Output A.
You can change play mode at any time in Preferences → Play Mode. The current mode is saved with your project.
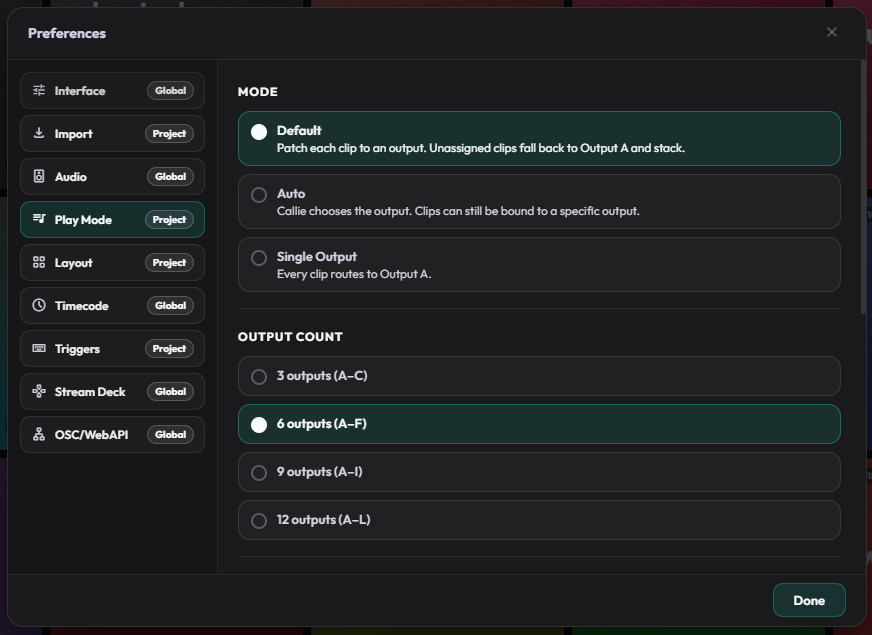
Upgraded from an older version? The old Auto mode has been merged into Default. Default now combines both behaviours: clips you’ve assigned to an output still go there, and unassigned clips are distributed automatically.
Default Mode
Section titled “Default Mode”In Default mode, every clip can be patched to a specific output letter: A, B, C, and so on.
How it works:
- Each clip has an Output setting in Clip Settings. Assigned clips always route to their output.
- Unassigned clips auto-distribute — when you trigger a clip with no output set, Callie Grams picks the first free output. If all outputs are busy it falls back to Output A.
- If you enable Require output assignment in Preferences → Play Mode, clips without an output will not play until assigned.
- Multiple clips can play on the same output at the same time — they stack, unless the output is exclusive (below).
- Clips on the same output can be organized into slots, shown as
1a,2a, etc.
Best for:
- Complex shows where different audio types need separate destinations.
- Routing music to one output and sound effects to another.
- Feeding different outputs to different Dante channels, mixers, or stream inputs.
- Live shows where you want each new unassigned clip to grab its own output.
Per-output exclusivity
Section titled “Per-output exclusivity”In Preferences → Play Mode → Outputs, each output has:
- An Exclusive checkbox — when enabled, that output holds only one clip at a time: triggering a new clip on it replaces the one currently playing.
- A Stop / Crash stop toggle (active when Exclusive is on) — controls how the outgoing clip ends: Stop fades it out; Crash stop cuts it immediately.
Output A is typically left non-exclusive so cues can stack; exclusivity is useful on music-bed or long-effect outputs.
Single Output Mode
Section titled “Single Output Mode”In Single Output mode, every clip routes to Output A.
How it works:
- No per-clip output assignment needed.
- All clips stack on Output A.
- Quick to set up and easy to understand.
Options:
- Quick-fire all — force zero fade-in on every trigger.
- One at a time — stop all playback before each trigger.
Best for:
- Simple soundboard use.
- Streaming and podcasting where everything goes to one virtual cable.
- First-time users evaluating Callie Grams.
Comparing the modes
Section titled “Comparing the modes”| Feature | Default | Single Output |
|---|---|---|
| Per-clip output assignment | ✅ Yes | ❌ No |
| Automatic distribution of unassigned clips | ✅ Yes | ❌ No |
| Clips stack on same output | ✅ Yes (unless exclusive) | ✅ Yes |
| Per-output exclusivity | ✅ Optional | ❌ No |
| Best for | Complex routing & live performance | Simple use |
Per-clip behaviour settings
Section titled “Per-clip behaviour settings”No matter which play mode you use, each clip also has behaviour settings that control how it plays.
Quick Fire
Section titled “Quick Fire”When Quick Fire is enabled, every trigger starts a new instance of the clip. The instances layer on top of each other. Great for repeated stings, rimshots, or sound effects you want to punch rapidly.
When Quick Fire is off, triggering the same clip again obeys the Retrigger Mode.
Retrigger Mode
Section titled “Retrigger Mode”Controls what happens when you trigger a clip that is already playing:
- Play / Stop (default) — the second press stops the clip; press again to play it from the start.
- Pause / Resume — pause playback on the second press, resume on the third.
- Restart — stop the current instance and immediately start it again from the beginning.
- Ignore — the second trigger does nothing.
Set Retrigger Mode in Clip Settings → Playback & Audio, or quickly from the right-click context menu’s Retrigger panel.
Output counts
Section titled “Output counts”In Default mode you can choose how many outputs are available:
- 3 outputs (A–C)
- 6 outputs (A–F)
- 9 outputs (A–I)
- 12 outputs (A–L)
Set this in Preferences → Play Mode → Output Count.
Single Output mode always uses Output A only.
Choosing your mode
Section titled “Choosing your mode”Just getting started?
Use Single Output. Add clips, trigger them, and get comfortable with the interface.
Need separate destinations for music/effects/VO — or hands-off output management?
Switch to Default. Assign clips that need fixed destinations; leave the rest unassigned and Callie Grams will distribute them automatically. Add exclusivity on outputs that should never stack.
You can change modes at any time. Existing output assignments are preserved, so switching back to Default restores your patches.